Wednesday, October 28, 2015

OpenSSL commands for certificate generation

Openssl is a command line tool used to generate certificates which will be used for opensource webservers like Apache and appservers like tomcat.

Most Linux/Unix platform will have openssl installed.

Check openssl is installed by issuing the command
openssl version.Below is the output.

[}$ openssl version
OpenSSL 1.0.0-fips 29 Mar 2010

To set up a SSL we need
1.private key
2.certificate request to send to CA
3.Get the certificate from CA via email.

openssl genrsa -des3 -out test.key 2048

The above command has genrsa which is to use RSA algorithm.des3 which is triple DES  algorithm  to encrypt passphrase and 2048 is the bit size.

openssl genrsa -aes128 -out test.key 2048 

In the above command mentioned aes algorithm  to use for key protection  if you dont want des3.
There are many websites to give the command you dont have to remember the command. 

2.Generate CSR.

CSR is the one where  you will provide your website information which will be used by CA to generate the certificate.

openssl req -new -key test.key -out test.csr
Once you type the command it will ask for passphrase and some other info like country ,state,email and common name.

To skip typing these either you can put the config in cnf file or put the details in the command itself.

[req]
prompt = no
distinguished_name = distinguished_name

[distinguished_name]
CN = www.test.com
emailAddress = test@test.com
O = Test Ltd
L = London
C = GB 


Place the above line in a file called test.cnf and issue the command below
openssl req -new -key test.key -out test.csr -config test.cnf
it will only ask for passphrase of the private key since other details are already mentioned in the cnf file.

The above example is for single domain.For multi domain you have to configure subject alternative name (SAN) in the cnf file with v3 extensions.

Once the csr is generated open the file with text editor and copy the content fully and paste it in any CA site you wish.


Monday, July 20, 2015

Perl script to zip native logs in websphere

#!/usr/bin/perl
my $dir='/websphere/logs';  (set to your log path directory)
if( -d $dir )
{
@jvmlist=`ls $dir/ |grep jvm`;   (grep for the content of your appserver name)
foreach(@jvmlist)
{
chomp($_);
my $loglist=`find $dir/$_/ -type f -name native_stderr.log -size +10k`;  (decide the size to zip)
if(length($loglist) > 0 )
{
print $loglist;
chdir "$dir/$_";
my $dat=`date +%d-%m-%y`;
chomp($dat);
`gzip -c native_stderr.log > nativelog_$dat.gz ; > native_stderr.log`;
}
}
}

Saturday, June 6, 2015

Application Edition Rollout in Websphere 8.5

In Websphere 8.5 we can install different edition of the same application.While installing application there is a text box to input the edition number and description.

Once you have installed your editions of application you can rollout the new one to replace the old application without any outage.

I have installed two editions of HelloWorld App deployed in a dynamic cluster.


The edition 1.1 is active now .And  we replace the application with old base edition with Application Edition Controller feature.

Select the Checkbox of application which you want to rollout and click Rollout button.
It will take you to next page where certain configuration is needed.

 Rollout strategy 


Use group rollout to replace editions on members of the target cluster in a group of one. Group rollout is the most typical choice, and is useful when the cluster contains four or more members. Alternatively, you can perform group rollout with a specified group size through scripting. For more information about group rollout, read about application edition management administrative tasks. When the new edition becomes available during group rollout, all requests are directed to the new edition.

Use atomic rollout to replace one edition with another on half of the cluster at a time. This rollout type serves all user requests with a consistent edition of the application. Because all user requests are served a consistent edition, your cluster runs at half capacity. If your cluster has four or more members, consider dividing up the cluster into smaller groups by performing a group rollout. Atomic mode is also used with a single server deployment target. In a single server deployment target, the actions that are carried out against the second half of the cluster are omitted. If you stop your deployment targets before you start atomic rollout, the deployment targets are started when the new edition replaces the active edition regardless of the reset strategy you choose. This procedure provides better availability to the requests that are serviced during the rollout period.

Reset Strategy

Soft reset will restart only the application .If no native libraries is used by your application soft reset is enough.

Hard reset will restart the application server so the native files as well  can be loaded if needed by your application.

Drainage Interval
   Drainage interval is the time to wait for the existing affinity requests to be served .If the requests ended before the drainage interval time ,websphere will not wait till that time it will proceed with application rollout.
If you want it to wait till the mentioned drainage interval you have to set a custome property
appedition.rollout.softreset.fulldrainageinterval to true


Now the base edition is active .The application will be started automatically.

Enable and restore Checkpoints in Websphere 8.5

Checkpoint is a new feature introduced in WAS 8.5.It will be used to restore the data if  we committed the data wrongly.

Two types of checkpoint one is Delta and other is Full.

Full Checkpoint will backup all your respository and it has to be done manually.

Delta checkpoint will  be created automatically once you enable it ,and it will backup only the configuration changes made at the last time.


Checkpoint depth is used to limit how many backup is allowed .Once it crossed the limit it will delete the old backup automatically.

Once you have enabled delta checkpoint you can see under Repository Checkpoints a checkpoint has been created.

To check how it works I deleted a server and saved it to master repository.And I restore it back by selecting the latest checkpoint available in repository.
And it worked the deleted server has been restored.It may ask you to logout of the console to refresh the workspace.And if multiple people working on the console at the same time then the changes made by others will conflict and it will not be saved.

Saturday, May 9, 2015

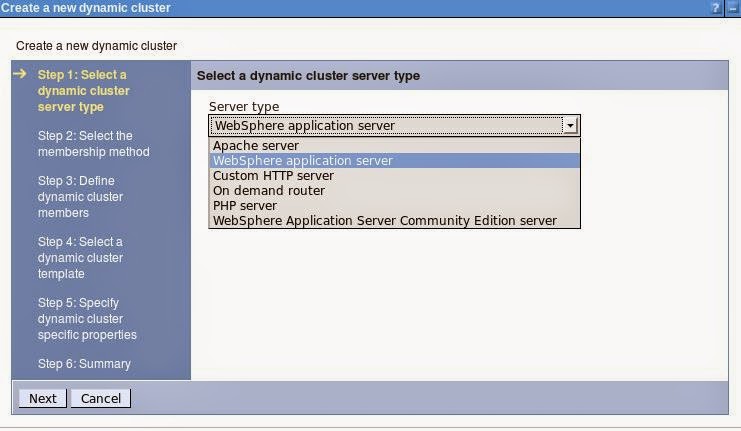
Dynamic cluster creation in Websphere 8.5 via console


 You can click on preview membership to see which are the nodes belong to the node group selected.And also you can  use the subexpression builder to  change the expression you want.You can chose the server belong to particular node etc..
 In this one i have a selected a template from a server which is already existing.
 Keep on instance started at all times.If you cluster has more than 1 member websphere intelligent management will make sure  one server is  always available.I have mention Limit the number of instance that can start as 1 so it will not start more than one instances at any time.

wsadmin dynamic cluster creation websphere 8.5

Go to dmgr bin folder.

./wsadmin.sh -lang jython -username <user> -password <urpassword>
wsadmin>options = ['-membershipPolicy "node_nodegroup = \'DefaultNodeGroup\'" -dynamicClusterProperties "[[operationalMode automatic][minInstances 1][maxInstances 1][numVerticalInstances 1][serverInactivityTime 1440]]" -clusterProperties "[[preferLocal false][createDomain false][templateName default][coreGroup DefaultCoreGroup]]"']
wsadmin>AdminTask.createDynamicCluster('testdyn',options)


The above command will create dynamic cluster and add the server which belong to DefaultNodegroup as cluster members automatically.

When any new server created and its part of the Default nodegroup will be added as cluster member.

Saturday, April 4, 2015

Install Websphere 8.5 IBM Installation Manager silently in preferred location

Download the Installation Manager zip file from IBM site.

Will explain the steps first and give a script to automate this.

unzip the files in desired location.

Edit the install.xml to define the preferred location during silent install.

Original install.xml file:
<?xml version="1.0" encoding="UTF-8"?>
<agent-input clean='true' temporary='true'>
<server>
<repository location='.'/>
</server>
<install>
<offering features='agent_core,agent_jre' id='com.ibm.cic.agent' version='1.6.2000.20130301_2248'/>
</install>
</agent-input>


Modified File:
<agent-input clean='true' temporary='true'>
<profile id='IBM Installation Manager' kind='self'>
<data key='installLocation' value='/websphere8.5/InstallationManager/eclipse'/>
</profile>

<server>
<repository location='.'/>
</server>
<install>
<offering profile='IBM Installation Manager' features='agent_core,agent_jre' id='com.ibm.cic.agent' version='1.6.2000.20130301_2248'/>
</install>
</agent-input>
The below lines has been added 


<profile id='IBM Installation Manager' kind='self'>
<data key='installLocation' value='/websphere_8/InstallManager/eclipse'/>
</profile>

And also in offering attribute profile='IBM Installation Manager' is added

Now execute the below command to do silent install of IBM installation Manager
 ./installc -log /tmp/install.txt -sP -acceptLicense
                 25%                50%                75%                100%
------------------|------------------|------------------|------------------|
............................................................................
Installed com.ibm.cic.agent_1.6.2000.20130301_2248 to the<mentioned directory in install.xml>
cat /tmp/install.txt should contain the following lines if installation is successfull
<?xml version="1.0" encoding="UTF-8"?>
<result>
</result>

Shell script to automate the above steps:
cd <IIM agent path>
unzip agent*.zip
sed -i "2 a\<profile id='IBM Installation Manager' kind='self'>" install.xml
sed -i "3 a\<data key='installLocation' value='/websphere8.5/InstallationManager/eclipse'/>" install.xml
sed -i "4 a\</profile>" install.xml
/installc -log /tmp/install.txt -sP -acceptLicense


Tuesday, March 10, 2015

CWSIS1535E The messaging engine's unique id (ME_UUID) does not match that found in the data store issue in infosphere MDM

SIB Message Engine has a unique UUID.The UUID can be found in websphere administrative console.

Navigate to Buses > Busname > Messaging engines.

If you are using datasore check in the DB whether the Messaging engine UUID matches or not.If it is  not matching thenyou will get this error.

Please refer the IBM Link for resolution.

make sure the Create tables checkbox is checked.
Restart the MDM server and the tables will be containing the new entries.

If Messaging engine did not start your MDM JVM will not start .


Wednesday, February 4, 2015

Websphere application server template creattion in WAS 8.5

In Websphere Templates were available to create a standardised environment without much repetitive work.

To create a server template a single application server has to be created before.You can configure all the settings to that application server and create a template using that server

This is an example in WAS 8.5,


To understand how template work and benefits please visit the IBM Developer Link

Tuesday, February 3, 2015

wsadmin jython Websphere Variable creation

Below is the function you can use to create Websphere Variable at cell scope

def variableCreation():
   cellname=AdminControl.getCell()
   varName='urvarname';
   varValue='urvarvalue';
   AdminTask.setVariable('[-variableName '+varName+' -variableValue '+varValue+' -scope  Cell='+cellname+']')

Friday, January 30, 2015

Websphere 8.5 Network deployment trial download and installation

Go to IBM developer website  to download websphere ND trial software.

Login with your IBM credentials to download the required packages.

Websphere 8.5 ND trial has 3 parts,all need to be downloaded.

IBM Installation Manager is needed to install Websphere ND.So download IBM Installation manager as well.If needed you can download http server etc...

Step 1:Install IBM Installation Manager

Step 2 .Extract all the three parts in a folder .After extraction you will find repository.config which needs to be added in IIM.

PFB the screenshots for Installation.
Click on Install

Go to File->Preferences to add the repository config

Select the packages needs to be installed.Here only WAS ND is available
 Accep license in next step and click next
Select None if you dont want to create profiles now.Click on finish.

Also found a very good link which explains installation in Linux with diagram.
geekflare 

Monday, January 12, 2015

Apache 2.4 Installation Redhat Linux 6

Overview given in apache website


Download $ lynx http://httpd.apache.org/download.cgi
Extract $ gzip -d httpd-NN.tar.gz
$ tar xvf httpd-NN.tar
$ cd httpd-NN
Configure $ ./configure --prefix=PREFIX
Compile $ make
Install $ make install
Customize $ vi PREFIX/conf/httpd.conf
Test $ PREFIX/bin/apachectl -k start

 PREFIX is the path where you want to install

For Apache 2.4 apr,apr-util and pcre are the prerequisite software.

Download apr and apr-util  from here.
Download pcre from here

Configure apr ,
make
Check make is fine with command make clean
then make install

Configure pcre using the below command
./configure --disable-cpp --disable-shared --prefix=/usr/local/pcre-8.35
make
make clean
make install

Once the prerequisite softwares are successfully installed lets configure apache

./configure --prefix=/home/apache --enable-pcre=static --with-pcre=/usr/local/pcre-8.35

make
It will take time as it has to compile many modules

check make using make clean command

make install.

The Apache 2.4 is installed.

Configure the httpd.conf as needed

Go to apache home and start the httpd.

ps -ef|grep httpd to check the process is started


If you want to uninstall apache use yum erase  or yum remove to uninstall .

yum search httpd will give  the packages installed.

yum erase httpd httpd-tools

yum remove httpd